I remember the moment vividly. I was setting up a crucial shot, and just as I was about to press record, the entire camera support wobbled uncontrollably. My heart sank. That subtle shake? It wrecked the shot, forcing me to reset, waste time, and lose a perfect take. It struck me then—no matter how advanced our gear gets, some old-school solutions like sandbags remain irreplaceable for stability.
The Hidden Power of a Simple Sandbag
For years, professionals have been anchoring their setups with sandbags, and for good reason. They’re cheap, reliable, and incredibly effective at preventing those annoying micro-movements that ruin high-stakes scenes. When I first started, I thought I could outsmart physics with lighter, more expensive supports. Turns out, I was making a costly mistake. Sandbags ensure your camera, lights, and even backdrops stay perfectly in place, especially outdoors where wind is unpredictable.
If you’ve ever faced shaky footage or unsteady lighting, I bet it’s because you underestimated the importance of proper stabilization. As I learned from seasoned crew members, a good sandbag is as vital as your camera or lens. Don’t just take my word for it—industry standards reinforce this. For instance, the Why Heavy Sandbags Are Non-Negotiable for High-Key Sets article highlights how weight and placement make all the difference in maintaining scene integrity.
Is There Really No Better Solution Than Sandbags?
Admittedly, in some situations, alternatives like weighted plates or specialized stabilizers are available. But nothing beats the versatility and ease of use of a simple sandbag. Plus, I made the mistake early on of stacking multiple lightweight supports without anchoring them properly. That oversight led to extra retakes and a dented budget. Trust me, when it comes to stability, a robust sandbag can be your best friend—it’s the safety net every experienced professional swears by. If you’d like tips on maximizing their effectiveness, check out this comprehensive guide for ensuring your setup remains rock-solid.
Now, with that understanding, let’s dive into how you can choose and position the perfect sandbags to keep your gear steady, no matter the environment. Because in our world, stability isn’t just a preference; it’s a necessity.
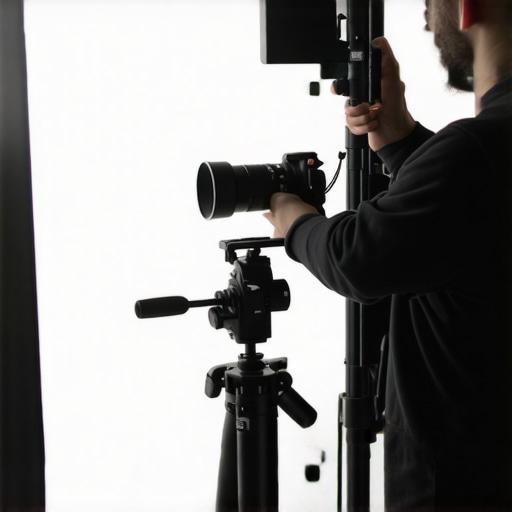
Determining the Right Sandbag Placement
Start by identifying which equipment needs anchoring—camera supports, light stands, or projection screens. For instance, during a shoot in windy conditions, I secured the tripod legs of my handheld rig with sandbags positioned close to the center of gravity, balancing weight evenly on all sides. Use no less than 25-pound bags for light stands and camera rigs, and double that for heavy equipment. Think of sandbags as the weight of a good suspension bridge—distributed correctly, they prevent unwanted sway.
Positioning for Maximum Effect
Place sandbags on the legs or base of supports, ensuring they resist lateral movement. When securing a cine-stand, I often slide the sandbag over the support’s base plate, then gently tap it to ensure it sits flush. Placing the bag slightly towards the support’s center, rather than at the edges, increases stability, much like anchoring a tent pole closer to its center prevents it from wobbling in the wind. For overhead mounts, like boom arms or overhead lights, balance the sandbags symmetrically to maintain center of gravity.
Securing and Anchoring Techniques
Once positioned, ensure the sandbags are tightly closed and, if possible, tethered to supports with bungee cords or straps for added security. I recall once using a temporary setup where a poorly secured bag slipped during a gust, causing a minor mishap. To prevent this, I pass the bungee through the handle of the sandbag and loop it around the support’s base, locking it in place. This prevents accidental shifts, especially on uneven terrain or outdoor locations.
Dealing with Wind and Outdoor Challenges
In outdoor conditions, I double the number of sandbags and stagger their placement—one at the support’s base, others on nearby stable ground. During a shoot on a beach, I buried some bags partially into softer sand to prevent slipping and used additional weights on the support feet. Think of this like a boat anchoring in strong currents; multiple points of resistance keep everything steady. Using a heavy-duty tarp or windbreak behind the setup can also protect against gusts. For instances where wind is persistent, I recommend using sandbags with handles for quick adjustments and secure tethering to nearby objects.
Safety and Best Practices
Never overfill bags to avoid bulging or tearing. Always check for and repair any rips or leaks—nothing compromises stability more than a compromised sandbag. During my first outdoor shoot, I neglected to inspect my bags, and a small tear caused sand to spill, temporarily destabilizing my setup. Regularly inspect and replace worn bags, and keep a few extras on hand for quick swaps. Picture these sandbags as the backbone of your stabilization strategy—they keep your gear and your shot intact, no matter how unpredictable the environment becomes. For more insights on securing your gear efficiently, visit this detailed guide.While many professionals focus on choosing the latest LED panels or premium cine lenses, there’s a lot of misinformation surrounding fundamental aspects like film lighting, projection screens, and camera supports. Let’s dig deeper into what most people get wrong and how understanding these nuances can elevate your craft
Are All Lights Created Equal for Cinema?
Contrary to widespread belief, not all lighting solutions serve the same purpose. Many assume that higher lumen outputs automatically translate to better lighting, but in reality, color rendering index (CRI), spectrum quality, and beam control are more impactful on cinematic visuals. Overlooking these factors leads to flat, unnatural images or unwanted color casts. For example, a high-lumen LED that struggles with color fidelity can cause skin tones to look washed out or too warm, affecting the mood of the scene. Professionals recommend selecting fixtures with high CRI ratings and spectral balances aligned with your camera’s color science. To master lighting that truly elevates your visuals, check out this guide.
Myth: Projection Screens Are One-Size-Fits-All
Many believe that choosing a high-gain screen will automatically improve brightness and contrast, but this is a trap. High-gain screens can cause hotspotting, where certain areas appear overly bright, and off-axis viewing angles diminish image quality. For cinematic applications, the type of screen texture and gain should match the room environment and projector characteristics. For instance, a matte white screen with a neutral gain often provides better color accuracy and wider view angles, especially in more variable lighting conditions. Before investing, study the room’s ambient light and intended use. Discover top recommendations for different environments in this resource.
The Advanced Mistake: Misusing Cinema Lenses and Support Systems
One nuanced mistake is selecting cine lenses solely based on maximum apertures without considering focus breathing or focus shift across the zoom range; these issues can subtly undermine your shots’ consistency. Additionally, many overlook the importance of proper camera support calibration. For example, an uneven tripod head or improperly balanced gimbal can introduce micro-vibrations that, when magnified, cause distracting jitters. The common misconception is that sophisticated stabilization gadgets can fix all such problems; however, choosing the right support system and setting it up correctly is often where the real stability is achieved here’s a detailed overview. Remember, advanced equipment requires advanced setup. Have you ever fallen into this trap? Let me know in the comments.
Maintaining your film gear isn’t just about avoiding breakdowns; it’s about ensuring consistent quality and extending the lifespan of your investment. From camera supports to projection screens, having the right tools and routines can make all the difference. One essential tool I rely on is a high-quality microfiber cloth combined with a dedicated lens cleaner, like the CineLensClean Kit. This duo allows me to keep lenses pristine without risking scratches, especially during shoots in dusty or humid environments. Regular cleaning prevents dust buildup that can cause micro-vibrations or image degradation over time, aligning with industry best practices outlined in this guide.
In addition to cleaning supplies, a digital maintenance log is invaluable. I use a simple spreadsheet to track software updates for my digital equipment, calibrations, and part replacements. This proactive approach helps me avoid unexpected failures during critical shoots. For instance, routinely updating firmware on cinema projectors like the latest models ensures you benefit from bug fixes and feature improvements, reducing downtime.
How do I keep my gear functioning smoothly over time?
One method I swear by involves regular lubrication of camera support hardware, such as tripod joints and gimbal motors. Using a lightweight, high-grade grease like SuperLube Synthetic Grease prevents stiffness, corrosion, or squeaking, ensuring smooth operation. Remember, tools like this balance guide can help you optimize your setup, but the hardware must be well-maintained to perform optimally.
Another crucial aspect is investing in protective cases with foam inserts tailored to your equipment. Hard cases from brands like Pelican keep dust, moisture, and impacts at bay, especially during transport between locations. Proper storage and transportation prevent misalignments or mechanical wear that compromise long-term operational integrity.
Looking ahead, I predict that smart maintenance tools—like IoT-connected sensors embedded in support gear—will alert us to potential issues before they happen, much like predictive diagnostics in industrial equipment. Staying ahead with these innovations means fewer surprises during filming and more reliable results.
What advanced techniques can you try today?
For immediate gains, I recommend performing a thorough lubrication of your support equipment, following manufacturer guidance. It’s a simple step that drastically improves longevity and performance. Plus, pairing this with routine software updates and environment checks ensures your setup remains as dependable as it was on day one. Want more tailored tips on prolonging your gear’s life? Visit this contact page or explore detailed strategies in our comprehensive guides.
The Hidden Lessons From My Most Challenging Shots
One of the most valuable lessons I learned was that even the most advanced equipment can’t replace the reliability of fundamental stabilization techniques like sandbags. Precision is everything in filmmaking, and overlooking simple stabilizers often leads to costly retakes and frustration. Remember, consistency in your shots stems from understanding your gear’s limitations and respecting tried-and-true methods.
Another insight came from the importance of meticulous support placement. I discovered that balancing sandbags close to the center of gravity and securing supports with tethered straps can prevent unexpected shifts, especially outdoors. Small tweaks in positioning can vastly improve stability, making your film look seamless and professional.
Additionally, I realized that outdoor challenges demand proactive solutions. Using multiple sandbags, burying them partially in soft ground, and employing windbreaks have saved countless shoots from the chaos of nature. These techniques aren’t glamorous, but they are essential for maintaining shot integrity regardless of environment.
Finally, consistent safety checks and maintenance of support gear prevent avoidable accidents. Regularly inspecting and repairing your sandbags, supports, and mounting hardware ensures your setup remains rock-solid day after day. Think of it as strengthening your toolkit—small investments in upkeep pay dividends in shot quality and crew safety.
My Go-To Resources to Elevate Your Filmmaking Stability
- Mastering Film Lighting: This guide was a turning point in understanding how proper lighting complements support stability, enhancing overall shot quality. Explore it to sharpen your tech choices and lighting setups.
- Support Systems Demystified: A detailed overview of camera supports that emphasizes calibration and support selection, helping me avoid micro-vibrations and jittering issues. It’s an essential resource for professionals seeking precision.
- Projection Screen Insights: Although focused on screens, this resource underscores the importance of environmental planning—lessons that apply equally to outdoor stabilization challenges. It’s invaluable for comprehensive set design.
- Contact-Us Page: When I need personalized advice or troubleshooting, reaching out for expert tips has always saved me time and stress. Use it as a direct line to industry veterans for tailored guidance.
Keep Your Confidence Growing in Every Frame
Stability isn’t just about gear—it’s a mindset rooted in careful planning, routine maintenance, and embracing foundational techniques. Every scene you shoot is an opportunity to refine your approach and build trust in your setup. Remember, mastery comes from consistent practice and the willingness to learn from every challenge faced.
Are you ready to double down on your stabilization strategies and elevate your filmmaking quality? Share your experiences or ask for tips below—I love hearing about what works in your projects!
**