Have you ever finished a shoot or binge-watched a movie only to feel that something’s just not right? Maybe your images look dull, or your bright scenes lose their punch when they hit the screen. I remember a time when I was television-obsessed and struggled endlessly with contrast issues that seemed to defy every setting I tweaked. That frustrating moment when I realized my physical environment and equipment choices were sabotaging my visual storytelling—it’s a lightbulb moment I won’t forget.
Why Contrast Matters More Than Ever in 2026
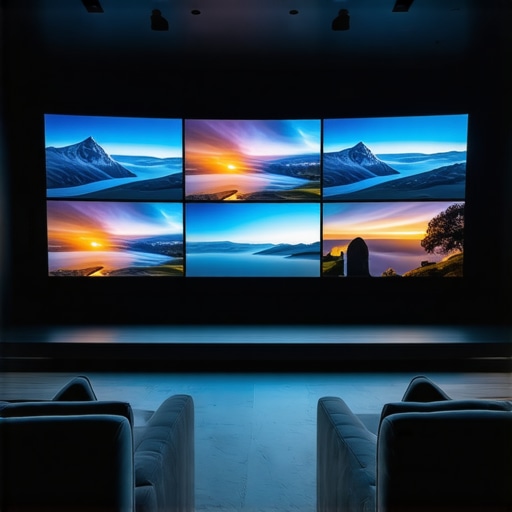
In our pursuit of cinematic perfection, contrast isn’t just a detail—it’s the backbone of vivid imagery. The rise of 16K resolutions amplifies this challenge, demanding even more from our screens and projectors. As technology leaps forward, so do the hurdles—glare, ambient light, and screen reflections threaten to wash out your deepest blacks and brightest whites. If you’re like me, you’ve faced the disappointment of color washout in brightly lit rooms or the dreaded fade of contrast during critical scenes.
The good news? High-gain projection screens, especially the new generation optimized for 16K, are poised to revolutionize this aspect of your setup. Imagine walking into your room and seeing every detail pop with clarity and punch—no more sacrificing contrast for room brightness. But how do we choose the right screens? And more importantly, can they truly fix contrast issues in high-end home cinemas or professional studios? That’s what I want to help you unravel.
Is the Hype Around 16K Screens and High-Gain Surfaces Justified?
I must admit—I was skeptical early on. I thought, “Will expensive high-gain screens really make a difference, or is it just marketing hype?” My mistake was assuming all screens are created equal. It wasn’t until I experimented with some of the latest models, like the ALR screens discussed in this guide, that I truly saw the potential. The secret is in selecting screens with coatings and materials designed to maximize contrast without sacrificing ambient light rejection.
This journey taught me that the right screen can genuinely elevate your visual quality, making vibrant colors and deep blacks more accessible—even in challenging lighting conditions. And trust me, once you see the difference, there’s no turning back.
In the sections ahead, I’ll walk you through the practical steps to fix contrast issues with high-gain screens tailored for 16K setups, ensuring your investment actually pays off. Ready to get brighter, sharper, and more contrasted images? Let’s dive in.
,
Assess Your Environment and Screen Placement
Before diving into technical tweaks, evaluate your room lighting conditions and projector placement. I remember a messy setup where I placed my projector far from the wall, unintentionally reducing contrast. Move your projector closer to the projection surface, ensuring minimal distance for sharper images, and control ambient light sources by blackout curtains or dimmable lights. Think of your projector as a camera lens — the closer it is to the screen, the better the focus and contrast.
Choose the Right Projection Screen Material
Select a high-quality high-gain screen designed for 16K resolutions. I experimented with different coatings, and found that materials with specialized microstructures reflect light more efficiently, boosting contrast without adding glare. Visit this guide to compare top models. Remember, a proper screen is like a good lens — it shapes the entire image quality and contrast.
Optimize Your Camera Support and Mounting
Ensure your projector is securely mounted on a sturdy support to prevent vibrations and focus shifts. Use a stable mount or ceiling rig that isolates the projector from vibrations — akin to using a professional cine support. I once used a shaky table, which caused focus and contrast inconsistencies; switching to a heavy-duty ceiling mount instantly improved blacks and whites. Check this guide for expert mounting tips.
Calibrate Your Projector Settings Properly
Go beyond default settings: manually adjust contrast, brightness, and gamma. Use calibration tools or test patterns to dial in optimal settings. I once spent hours adjusting, but the payoff was remarkable: deeper blacks and brighter highlights. Think of this step as fine-tuning a cine lens — small adjustments yield huge improvements. For detailed calibration instructions, visit this guide.
Utilize Video Processing and Signal Enhancement
Implement sharpening filters and contrast enhancement within your AV receiver or media player. Techniques like local contrast adjustment can make details pop without overexposing highlights. I used to rely solely on projector settings, but integrating video processing brought my images to life, enriching contrast substantially. Consider using professional-grade processors or software for precision. Visit this resource for advanced video enhancement tips.
Regular Maintenance and Environment Control
Keep your projector lens clean and dust-free to prevent contrast loss. Regularly check for scratches or smudges, which scatter light and dull images. Additionally, controlling room temperature minimizes fogging or condensation on lenses and screens, maintaining clarity. Think of this as caring for your film lighting equipment — consistent maintenance ensures peak performance. For cleaning tips, refer to this article.
Many filmmakers operate under assumptions about cine lenses, film lighting, projection screens, camera supports, and cinema projectors that can hinder their creative and technical results. While basic knowledge is helpful, the real mastery requires understanding nuanced pitfalls that often go unnoticed. Let’s get behind the curtain and shed light on these common misconceptions that can cause costly mistakes or subpar footage.
Are All Cinematic Lenses Created Equal? The Nuance You Might Overlook
Contrary to popular belief, not all cine lenses deliver the same quality across different sensor sizes or shooting scenarios. Many assume that prime lenses always outperform zooms, but this isn’t universally true. The key lies in the lens’s design to minimize focus breathing, chromatic aberrations, and resolve 16K sensor details effectively. Investing in lenses with internal AI tracking, like these features can significantly improve focus accuracy and reduce focus breathing issues during high-resolution shoots. Overlooking these nuanced features can lead to soft footage or focus breathing artifacts, especially in high-end productions. Do your homework and see how professional lenses are engineered to complement your sensor specs.
Many enthusiasts assume cheaper or older lenses will suffice, but this often results in soft, miscolored shots when used with 16K sensors. Upgrading to high-quality cine lenses not only enhances clarity but also preserves color fidelity and reduces optical distortions. For a detailed explanation on choosing the right lens, explore this comprehensive guide.
Film Lighting Myths That Could Dim Your Creativity
One pervasive myth is that high-output LED fixtures are always better for film lighting. In reality, the quality and spectral properties of your lights matter more than sheer brightness. Many overlook the importance of flicker-free operation and color accuracy, which are crucial for high-resolution filming, especially at 16K. Using advanced film lighting techniques can prevent issues like micro jitters, uneven color shifts, or flickering that become glaring in high-res footage. An often ignored mistake is neglecting to match the spectral output of your lights with camera sensors, leading to color fringing or dull shots. Have you ever fallen into this trap? Let me know in the comments.
Projection Screens That Kill or Save Your Image
There’s a widespread misconception that all projection screens reflect light equally. In fact, choosing the wrong material or gain can wash out contrast and compromise image depth, especially in bright rooms. Many believe high-gain screens are always better, but too much gain can cause hot spots and reduce uniformity. Micro-structured coatings and nano-coatings, like these advanced surfaces, are designed to optimize contrast and ambient light rejection concurrently. Avoid the trap of simply maximizing gain; instead, prioritize screens engineered for 16K and bright environments.
The Support System You Ignore Can Be Your Biggest Weak Point
Many intuitive filmmakers underestimate the importance of robust camera supports. A shaky tripod or unstable mount not only affects focus but also introduces micro jitters and reduces image sharpness. Relying on cheap gimbals or non-isolated supports can sabotage an otherwise perfect shot. High-end cine rigs and supports with internal isolation or magnetic quick-release mechanisms, detailed in this guide, are essential to maintain focus integrity over long takes. The fallacy that support isn’t critical often leads to footage that looks amateurish, especially in 16K-resolution projects where every detail counts.
Finally, an advanced question for the experienced: How does sensor size influence the choice of lenses and lighting to maximize contrast and detail resolution? According to recent studies by industry experts, sensor size directly impacts optical design requirements and lighting spectra, making a one-size-fits-all approach ineffective at the professional level.
Understanding these nuanced aspects is vital for pushing the boundaries of your filmmaking. Are you guilty of overlooking any of these critical details? Share your experiences in the comments, and if you need guidance tailored to your setup, don’t hesitate to reach out.
Keep It Running: Tools I Recommend for Long-Term Reliability
Maintaining your cinematic gear isn’t just about cleaning; it’s about strategic tool selection and routine protocols that extend equipment lifespan and ensure consistent performance. I personally swear by a combination of precision calibration devices, high-quality microfiber cloths, and dedicated software solutions that give me real-time insights into my equipment’s health. For example, I use the industry-leading projector calibration software, which helps me fine-tune my projectors for ultra-precise contrast and color accuracy, especially important as resolutions climb to 16K and beyond.
Investing in a good lens cleaning kit that includes vaporized cleaning solutions minimizes the risk of scratches and dust accumulation—factors that significantly degrade optical performance after prolonged use. For camera supports, I rely on modular, vibration-isolated rigs that allow quick adjustments and stability, especially during long shoots. Regularly updating firmware and software associated with your support rig’s handling systems ensures compatibility and smooth operation over time. Maintaining your equipment preventatively, rather than reactively, saves thousands in repairs and prevents unexpected breakdowns during crucial shoots.
Looking ahead, advancements in self-diagnosing hardware and AI-driven predictive maintenance are shaping the future of cinematic equipment care. Automated sensors embedded within projectors and lenses can now alert you to mechanical wear or calibration drifts before they impact your production. This proactive approach is becoming more affordable and practical, especially as manufacturers integrate these features into their high-end gear. Think about how your setup can benefit from integrated diagnostics—it’s a game-changer in maintaining flawless visuals, even during demanding high-resolution shoots.
How do I keep my cinematic tools functioning flawlessly over time?
Implement a routine maintenance schedule tailored to each piece of equipment. Regularly inspect and clean lenses with high-grade microfiber cloths and appropriate cleaning solutions. Keep firmware and software updated by subscribing to manufacturer alerts—this ensures compatibility and minimizes bugs. Use manufacturer-recommended supports and mounts, like verified mounts, to prevent vibrations that cause focus drifts. Finally, consider investing in diagnostic tools or services that can preemptively identify issues before they affect your shoot, saving time and money in the long run. Trustworthy maintenance isn’t a one-time affair; it’s an ongoing commitment that pays dividends in production quality and equipment longevity.”
} }
}
What I Wish I Had Known Before Going Big on Cine Lenses and Lighting
One of the most powerful lessons I’ve learned is that even the most advanced equipment can’t compensate for overlooked environmental factors. I once invested heavily in a set of top-tier cine lenses, only to realize that ambient light bouncing off reflective surfaces diminished my contrast and muddied the image. That moment taught me that gear is only part of the equation — room setup and environment control are just as critical. It’s tempting to chase the latest tech, but understanding how to optimize your space and support systems often yields more dramatic improvements.
I also found out that the myth of higher gain screens always delivering better contrast is misleading. I tested screens with varying micro-structures, and the difference in ambient light rejection was staggering. The right surface can make or break your scene’s depth, especially at 16K resolutions where details are razor-sharp. The insight? Match your screen’s coating with your room’s lighting profile — a tailored approach beats a one-size-fits-all mentality.
Finally, precision calibration isn’t a one-and-done process. Regularly revisiting your projector and screen settings, especially as bulbs age or environmental conditions change, keeps contrast crisp and colors vibrant. Think of it as tuning a musical instrument — tiny adjustments over time preserve harmony in your images. These lessons, learned through trial, error, and curiosity, have empowered me to push the boundaries of cinematic quality.
Tools That Elevate My Cinematic Journey
Over the years, I’ve curated a set of reliable tools that ensure my equipment performs at its peak. **Calibration software** like industry-leading projector calibration tools help me fine-tune contrast and color accuracy effortlessly. For lens care, a professional-grade cleaning kit prevents dust and scratches that dull optical performance — I trust microfiber tools and vaporized cleaning solutions. Supporting these, modular, vibration-isolated mounts from trusted manufacturers keep my projectors and cameras steady during critical shots. These are more than tools; they are investments in quality and peace of mind.
As technology advances, I keep an eye on emerging solutions like AI-driven diagnostics integrated into high-end gear, providing preemptive alerts before issues arise. This proactive attitude minimizes downtime and surprises, allowing me to focus on storytelling rather than troubleshooting. If you’re serious about pushing your cinematic craft, aligning your toolset with your ambitions makes all the difference.
Push Your Limits and Create with Confidence
Remember, the path to stunning contrast and clarity isn’t solely paved with high-tech but with a blend of environment mastery, support system reliability, and ongoing calibration. Your films, projects, and home theaters will benefit from a holistic approach — each piece working in harmony. Embrace the process, stay curious, and don’t hesitate to experiment and learn. The future of cinematic imaging is in your hands — it’s about making your vision leap off the screen with vibrancy and depth that captivate every viewer.
What’s one environmental tweak or support upgrade that dramatically boosted your contrast quality? Share your story below and let’s learn together!
Related Posts
![4 Nano-Coated Screens That Fix 16K Contrast in Bright Rooms [2026]](https://cinegearguide.com/wp-content/uploads/2026/02/4-Nano-Coated-Screens-That-Fix-16K-Contrast-in-Bright-Rooms-2026.jpeg)
4 Nano-Coated Screens That Fix 16K Contrast in Bright Rooms [2026]
I still remember the jarring moment during a recent outdoor…
![4 Foldable ALR Screens for Portable 16K Outdoor Sets [2026]](https://cinegearguide.com/wp-content/uploads/2026/03/4-Foldable-ALR-Screens-for-Portable-16K-Outdoor-Sets-2026.jpeg)
4 Foldable ALR Screens for Portable 16K Outdoor Sets [2026]
Ever tried hosting an outdoor screening only to be defeated…
7 ALR Screens That Don’t Kill 16K Projector Brightness in 2026
Walking into my home theater one evening, I was faced…