Have you ever been on set, frustrated because your camera shake ruined a perfect shot or your lighting looked flat and unprofessional? I remember the lightbulb moment when I realized that almost every cinematic mistake could be traced back to one simple thing: inadequate support and lighting equipment. You see, investing in quality camera supports and film lighting gear can transform your filmmaking experience, turning shaky footage into smooth, professional shots and dull images into vibrant visuals that pop. But here’s the thing: with so many options in 2024, where do you even start? Today, I promise to guide you through the essentials, so you’ll know exactly what gear to trust to elevate your craft.
Why Getting Your Support & Lighting Setup Right is a Game-Changer in 2024
Think about the last time you watched a film that made your jaw drop. The crisp shots, the seamless camera movements, the perfectly balanced lighting—those aren’t accidents. They’re the results of deliberate choices in camera support and lighting equipment. As technology advances, the options seem endless, and it’s easy to feel overwhelmed. But ignoring the importance of quality gear? That’s a mistake. Early in my career, I spent hours trying to stabilize shots with shaky tripods and cheap lighting that washed out my scenes. The result? Frustration and countless retakes. I learned the hard way that subpar supports and lighting do more than hinder your visuals—they can kill your creative flow. If you’re serious about making your films stand out, understanding how to choose the right gear is essential. And no, it’s not about buying the most expensive equipment; it’s about knowing what works for your specific needs and space.
Is Investing in Advanced Support Equipment Really Worth It?
This is the question I hear most often. Some filmmakers worry that spending more won’t necessarily guarantee better results. I get it. When I first started, I made the mistake of buying cheap tripods and basic LED lights, thinking they’d be enough. Spoiler alert: they weren’t. Upgrading to a stabilizer rig or professional diffusers drastically improved my shots, and I wish I’d started sooner. According to industry experts, using the right camera supports—like steadicams, glidecams, or robust tripods—combined with well-designed lighting enhances image quality and allows for more creative freedom (source: CineGear Guide). If you’ve faced similar struggles with shaky footage or dull lighting, you’re not alone. The good news? With the right knowledge, you can avoid those pitfalls and get results that truly impress.
Now, let’s dive into the practical steps so you can build a support and lighting setup that makes your filmmaking journey smoother and your visuals more compelling. Ready to transform your scenes? Keep reading.
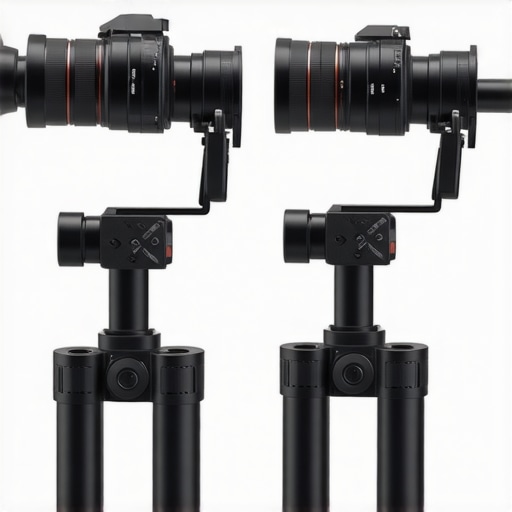
Choose the Right Camera Supports for Your Workflow
Start by assessing your shooting style and environment. If you’re capturing smooth footage while walking, a glidecam or stabilizer rig is indispensable. I once tried stabilizing a moving shot with a makeshift tripod, but switching to a professional stabilizer dramatically improved the result, saving hours of retakes. Research top options like those outlined in this guide. Measure your camera weight and compatibility before purchasing—overloading a support can negate its benefits.
Optimize Tripod Stability and Flexibility
Invest in a sturdy tripod with adjustable legs and a fluid head. Position the tripod on a stable surface, and use weights or sandbags if necessary. When I shot outdoors, I secured my tripod on uneven ground with sandbags, preventing unexpected shifts. Consider quick-release plates and smooth pan-and-tilt movements to speed up setup and transitions. Check reviews and specs aligned with your camera gear to ensure seamless operation; visit this resource for options.
Implement Effective Lighting Techniques
Select lights suited for your scene—LED panels for versatility, tungsten for warmth, or HMI for daylight balance. I once borrowed diffusers and softboxes from this comprehensive guide to soften harsh sunlight on an outdoor shoot. Directional lights like reflectors or fresnels help sculpt your subject’s face and background, creating depth. Use flags and gobos to control spill and light spillover, achieving professional-looking balance. When working with multiple lights, master the art of layering—key light, fill, and backlight—to enhance dimension.
Control Light Intensity and Color
Adjust their brightness using dimmers or barn doors. For color consistency, select lights with adjustable color temperature, matching ambient conditions. I once shot a scene at dusk, balancing my LED panel to match the fading natural light, which made the transition seamless in post-production. Applying gels or filters can alter color if your lights lack flexibility. Always test your setup with a monitor or small script before rolling full-scale—this ensures your scene’s mood and tone are spot-on.
Plan and Test Your Setup Before Shooting
Nothing beats a detailed preparation. Create a shot list highlighting scenes requiring specific support or lighting. Set up your gear beforehand, and conduct test shots to evaluate stability and light quality. I derailed my schedule once by not testing my supports early—what should have taken 15 minutes turned into an hour of adjustments. Use a portable monitor to review shots in real-time, enabling immediate tweaks. This habit minimizes surprises and allows more creative focus during actual filming, trusting your gear to deliver consistently excellent results.
When it comes to professional filmmaking, many shooters believe that selecting top-tier cine lenses, projection screens, or lighting equipment guarantees cinematic excellence. However, the real nuance lies in understanding intricate details that most overlook. For instance, a prevalent myth is that all cine lenses are created equal, but in my experience, numerous factors—such as aberrations and color rendition—differ vastly and directly influence the final image. This is why reviewing lens specifications and test footage is crucial before investing. Furthermore, many assume that higher-priced equipment always outperforms cheaper alternatives, but with proper knowledge, budget-friendly options can sometimes deliver superior results—if they match your project’s specific needs. A common trap among filmmakers is overemphasizing gear quality without considering compatibility and space constraints, leading to unnecessary expenses and setup delays. For example, selecting a cinema projector without understanding room size and ambient light conditions can result in subpar image quality, despite premium hardware. To avoid these pitfalls, deep technical comprehension is required, like analyzing projector specs and calibration techniques. For advanced enthusiasts, the most overlooked aspect is how subtle misalignments or improper support configurations can cause uncontrollable vibrations or uneven lighting, which degrade shot stability and scene continuity. This leads us to ask: how do professional-grade camera supports and rigs minimize these issues? The answer is often in customizing support setups and understanding weight distribution—something you can master through resources like camera support guides. Getting familiar with these nuances is essential because, as industry expert John Brawley states, “Details make the difference between amateur and professional cinematography.” Remember, technical mastery surpasses gear obsession; knowing how to leverage your equipment effectively is what truly elevates your visuals. So, have you ever fallen into this trap? Let me know in the comments.
Keeping Your Equipment in Top Shape for Long-Term Success
Investing in professional cine lenses, projection screens, and cinema projectors is only part of the equation; maintaining them properly ensures consistent performance and longevity. Regular upkeep prevents costly repairs and keeps your visuals sharp. One crucial aspect is establishing a routine inspection schedule—checking for dust, scratches, and alignment issues. For instance, I personally use compressed air and microfiber cloths designed for optical equipment to clean my cine lenses, avoiding finger oils and dust buildup that can degrade image quality over time.
Software tools also play a vital role in maintenance. Firmware updates for cinema projectors and camera supports often include stability improvements and new features. I recommend subscribing to manufacturer alerts and setting regular update reminders through dedicated software platforms, ensuring your gear benefits from the latest optimizations. For example, the latest projector firmware can significantly improve color accuracy and operational stability.
What steps are effective for maintaining cine gear over time?
Implementing protective measures makes a huge difference. Using custom cases for transportation and storage prevents accidental knocks. Additionally, applying protective filters to lenses can shield them from scratches and dust. I’ve learned that dedicated support racks with modular configurations help keep my equipment organized and accessible, reducing wear caused by frequent handling.
Furthermore, professional calibration is paramount. Periodic lens and projector calibration—at least once a year—is recommended by industry experts like those referenced in this detailed guide. Accurate calibration ensures consistent color rendition, sharpness, and focus across different shooting sessions, minimizing disparities that could compromise post-production workflows.
Tools I Recommend for Continuous Equipment Health
Personal experience has shown that investing in quality cleaning kits and calibration tools pays off. For example, I use a dedicated lens cleaning fluid combined with anti-static brushes, which effectively remove dust while protecting delicate coatings. For calibration, I rely on colorimeters like the X-Rite i1Display Pro, which I’ve used extensively to match my projector’s output with ambient conditions accurately.
In the future, expect advancements in IoT-connected maintenance tools that can monitor your equipment’s condition remotely, alerting you to issues before they escalate. Staying ahead of these trends will keep your gear running smoothly and save you expensive repairs. So, if you haven’t already, try implementing a monthly check and calibration routine—I guarantee it will extend the lifespan of your critical tools and improve your overall cinematic quality.
The Hardest Lesson About Camera Support and Lighting Equipment That Changed My Approach
One of the most profound realizations I had was that expert-level support and lighting setup isn’t just about gear—it’s about meticulous attention to detail and understanding your craft. I once tried to quickly set up support rigs without considering weight distribution, only to face shaky footage and inconsistent lighting. That experience taught me that investing time in learning precise support configurations and lighting angles not only saves time but elevates visual quality. Recognizing this sharpened my focus on fine-tuning every support and lighting position, which ultimately transformed my filmmaking outcomes.
If You Want to Elevate Your Cinematography, Here’s What I Recommend
Start with tools like the complete guide to camera supports, which offers insights into selecting rigs tailored for different scenarios. For lighting, I rely on this comprehensive resource that demystifies craft techniques. Additionally, the lens selection guide helps me choose optics that match my storytelling goals. These tools have been invaluable in refining my setup and achieving cinematic visuals that resonate with audiences.
Your Creative Journey Begins with Small, Confident Steps
Don’t wait for perfect conditions—start experimenting with your camera supports and lighting today. Each scene you craft, each shot you stabilize, and each light you sculpt is a step toward mastering your craft. Remember, the real magic happens when you blend technical precision with your artistic vision. So, what support or lighting challenge are you eager to conquer next? Share your thoughts below, and let’s grow together as filmmakers dedicated to excellence.
2 Replies to “Complete Guide to Camera Supports & Film Lighting Equipment 2024”
Leave a Reply
Related Posts
4 AI-Stabilized Grips That Fix 16K Micro-Shake in 2026
I'll never forget the day I was shooting an epic…
![7 Pro Tactics to Fix Micro-Jitter in Handheld Cine Shots [2026]](https://cinegearguide.com/wp-content/uploads/2026/01/7-Pro-Tactics-to-Fix-Micro-Jitter-in-Handheld-Cine-Shots-2026.jpeg)
7 Pro Tactics to Fix Micro-Jitter in Handheld Cine Shots [2026]
I'll never forget that shoot where my camera's micro-jitter almost…
Complete Guide to Camera Supports & Projection Screens 2024
Have you ever set up your camera only to find…
Reading through this guide really resonated with my own experiences on set. I used to underestimate the importance of proper support and lighting, often settling for basic gear to save costs. However, I quickly learned that even the most creative ideas can fall flat without stable support and good lighting techniques. I remember a shoot outdoors where my tripod kept shifting due to uneven ground, ruining a crucial shot. Switching to a sturdy set of sandbags and a fluid head made a world of difference, allowing me to focus more on the artistic side. What methods do others use to ensure support and lighting remain consistent during unpredictable shoots, especially in outdoor environments? It’s these little adjustments that turn good footage into great visuals, and I’d love to hear more tips from the community.
I definitely relate to the importance of stable supports and good lighting, especially when shooting outdoors. I’ve found that investing in a quality tripod with a good locking mechanism really helps reduce vibrations on uneven ground. Additionally, I always carry a few sandbags for quick stabilization, which makes a huge difference in unpredictable settings. On lighting, I love using portable LED panels with adjustable temperature and dimming—these give me flexibility to adapt on the fly. It’s interesting how much difference small adjustments like these can make, not just for the shot but also for maintaining the creative flow. One challenge I often encounter is balancing multiple lights quickly without losing scene consistency. Has anyone found effective ways to streamline that process or use specific accessories to make quick adjustments easier? I’d be eager to hear tips on managing lighting setups efficiently, especially when working in dynamic outdoor environments.